Your Cart is Empty


After over seven years modifying 4Runners and installing dozens of rear bumpers on my own rigs and for other enthusiasts, I’ve learned that few modifications transform both the function and appearance of your 4Runner like a proper rear bumper upgrade.
Whether you’re tired of the limited clearance from your stock bumper, need recovery points that won’t fail when you’re stuck in the backcountry, or want a solid mounting system for your oversized spare and recovery gear, choosing the right rear bumper is critical.
I’ve seen firsthand what works and what becomes an expensive trail repair. So, here’s a guide based on real-world experience, not just catalog specifications, so you can get the rear bumper that will work for you.

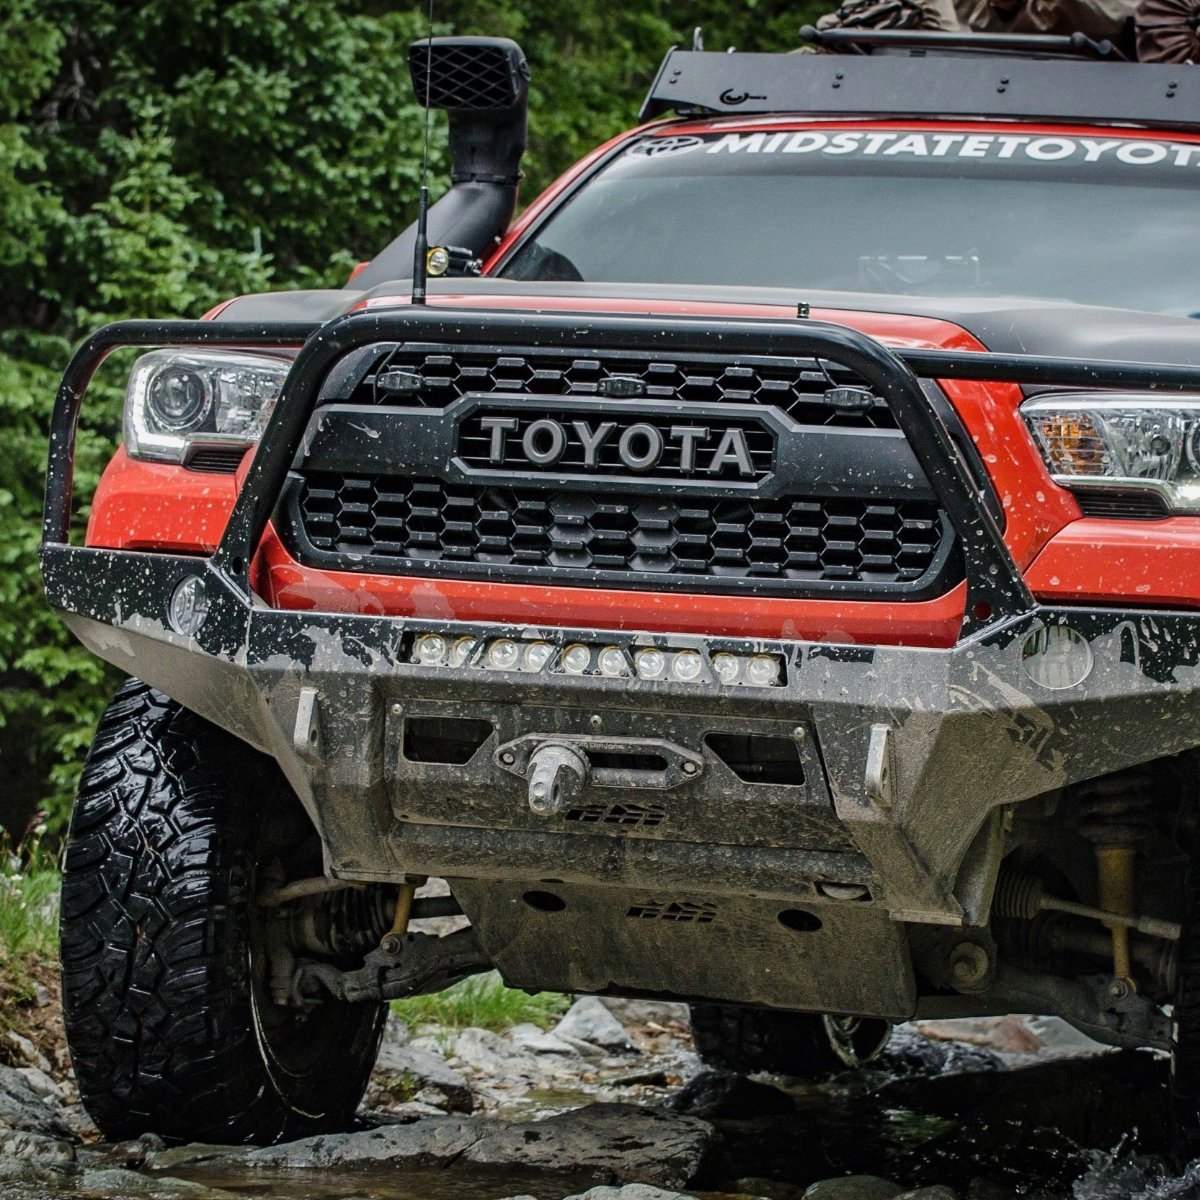
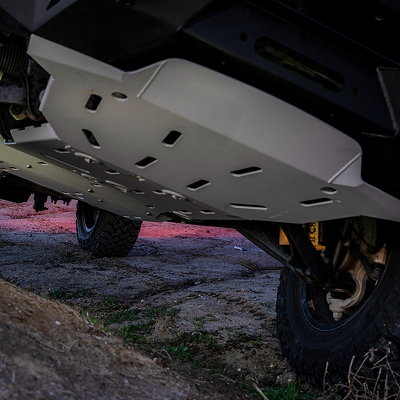
The stock rear bumper on the 4Runner has several critical limitations, particularly on 5th-gen models. The plastic-covered factory bumper offers minimal protection, lacks proper recovery points, sits too low for serious off-roading, and provides no options for carrying oversized tires or additional gear.
Aftermarket bumpers allow for various accessories to be added or removed, emphasizing their modularity and adaptability to different needs. When I swapped my factory bumper for a high-clearance steel option with swing-outs, my departure angle immediately improved by nearly 10 degrees, which makes the difference between scraping through rock gardens and clearing them cleanly.
Not all rear bumpers are the same. Let's differentiate them so you can narrow down which rear bumper mod you'd want to get on your 4Runner.
These direct replacements focus on protection and improved clearance without additional features. They’re typically bolt-on installations using the factory bolt holes, requiring bolts, nuts, and washers for securing various components, making them ideal for 4Runner owners wanting better protection without the added weight and complexity of swing-out systems.
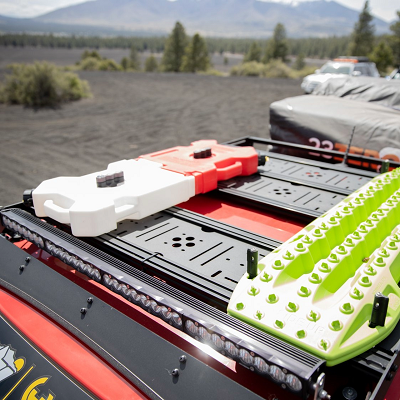
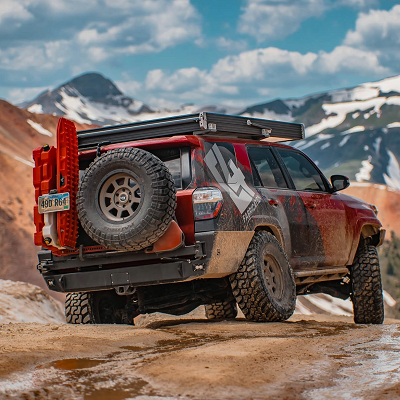
The Swiss Army knife of bumper systems. These incorporate one or two swing-out arms that typically house a spare tire carrier on one side and optional accessories like gas/water can holders or equipment mounts on the other.
On my overlanding 4Runner, the dual swing-out system lets me access the rear hatch even with a 35” spare tire mounted, while the second arm carries two RotopaX containers and a Hi-Lift jack. The ability to swing these components away from the rear hatch makes accessing gear infinitely easier during long trips. Additionally, you can add a ladder attachment to the swing-out system for easier access to the top of your vehicle, fairly useful if you have a roof rack to store your gear.
These replace the entire stock bumper and often part of the cross member, dramatically improving your departure angle for clearing trail obstacles. They typically sit higher and tighter to the vehicle body, allowing larger tires to clear rocks and ledges that would catch a stock bumper.
For proper installation of high-clearance designs, you may need to cut or modify the rear bumper, especially for 4Runner models from 2010 to 2013. This ensures that the new bumper fits correctly and accommodates accessories like cube lights.
Say you have a bumper in mind, how can you tell if it's a good one? Well, here are a few things to consider.
Most quality bumpers use steel in 3/16” to 1/4” thickness. While aluminum options exist and offer weight savings, I’ve found steel provides superior durability for serious off-road use. Yes, steel bumpers can add a ton of weight to the vehicle, affecting handling and fuel economy, but the weight penalty is worth the confidence of knowing your recovery points won’t fail when you’re miles from help.
Even if you don’t need swing-outs initially, consider whether your bumper can accommodate them as future upgrades. Certain swing-out features can double as steps, providing additional functionality. The best systems use sealed bearing hinges rather than bushings, the difference becomes apparent after a year of dusty trail use.
Never overlook properly rated recovery points. Quality bumpers incorporate 3/4" steel recovery tabs welded directly to the frame mounting plates, not just the bumper shell. I've personally witnessed improperly designed recovery points tear free during winch recoveries, turning a bad situation worse.
If carrying an oversized spare is important (and it should be for serious off-roading), ensure the tire carrier is rated for your tire weight and properly supported. The best carriers distribute weight between the bumper and tailgate or use the vehicle’s frame for mounting. Additionally, maintaining adequate space for larger tires and ensuring compatibility with various accessories is crucial for optimal functionality.
Integrated mounting points for lights, antennas, Hi-Lift jacks, and other accessories eliminate the need for additional drilling and provide secure attachment points engineered to handle off-road vibration. The appropriate location for mounting these accessories ensures optimal functionality and accessibility, allowing for easy customization based on your vehicle model.
Built-in housings for reverse lights, brake lights, and license plate illumination make installation cleaner and protect these components from trail damage. Some premium bumpers include pre-wired LED lighting.
Powder coating provides the best long-term protection, though quality varies widely. After trying multiple finishes, I’ve found textured black powder coat offers the best combination of durability and scratch resistance for trail use.
Steel bumpers with swing-outs can add 150+ pounds to your 4Runner. This affects handling, fuel economy, and puts additional stress on suspension components. Factor in the need for suspension upgrades when budgeting for your rear bumper.
After years of testing and trying out rear bumpers as well as bringing them to customers from different walks of life, here are some of the top 4Runner rear bumpers out there.
Having installed three C4 rear bumpers on different 4Runners, I've been consistently impressed with their innovative multi-function swing arm system that accommodates both a full-size spare and up to three jerry cans simultaneously. Their signature "no-cut" exhaust compatibility preserves your factory system while still delivering an impressive 30° departure angle, a game-changer on technical descents.
What separates C4's design is their unique adjustable spindle tension system that prevents swing-out sag even after years of heavy use. Their proprietary "Quick-Flip" license plate mount maintains legal compliance while disappearing when you need maximum clearance.

Dissent's innovative three-tier modularity sets them apart, start with just the base bumper, then add swing-outs, tire carriers, or jerry can holders as your needs evolve. Their exclusive high-clearance welded-in hitch option offers significantly better departure angles than the factory setup while maintaining full towing capability.
What truly impressed me with the Dissent Off-Road 4Runner rear bumper was their unique dual-finish option with dark gray primary surfaces and black accent pieces that creates a distinctive two-tone aesthetic unlike anything else on the market. They even let you see the welds because it's just that good, they're laying dimes out there. Their integrated Rigid lighting options, particularly the spreader pods with halo rings, provide unmatched nighttime visibility for trail repairs or camp setup.

Expedition One's 4Runner rear bumper with its patent-pending locking latch system is truly revolutionary, providing one-handed operation even after months of dusty trail use. Their unique accessory bundle approach lets you choose pre-configured systems like the terrain-named packages (Wasatch, Teton, Moab, Denali) that perfectly match different adventure styles.
What sets Expedition One apart is their ingenious universal plate backing system that accepts virtually any aftermarket mount, plus their exclusive bolt-on ladder option for roof access. Their spindle covers aren't just aesthetic, they provide maintenance-free bearing protection that's outlasted every competitor I've tested. The optional integrated Baja Designs Squadron lighting transforms nighttime camp setup from frustrating to effortless.

CBI's dual swing-out system features perhaps the most robust camp table integration I've tested, with a load capacity that easily handled my 35-pound camp kitchen setup without flexing.
What makes CBI stand out is their meticulous attention to bearing quality, using oversized sealed units that have proven virtually maintenance-free even after two seasons in the Mojave dust. The unique plate-steel construction method they employ creates a bumper with an exceptional strength-to-weight ratio, and their powder-coat finish has proven remarkably chip-resistant even after repeated rock strikes. Among heavyweight bumpers, their system offers the best tailgate clearance when fully open.
If you'd like a cleaner sleeker look, then you can also go for their classic series without the swing arms.

Backwoods Hi-Lite Swing-out rear bumper brings something truly revolutionary to the 4Runner market, their hybrid aluminum/steel construction creates a dual swing-out system that weighs nearly 40% less than comparable all-steel options. This weight savings fundamentally transforms handling dynamics, especially on technical terrain where every pound matters.
Their optional dual jerry can holder integrates seamlessly into the swing-out design with dedicated anti-rattle hardware that prevents the annoying "trail chatter" common with other systems. Among premium options, their corrosion-resistant finish has proven exceptional during my coastal testing.

While some rear bumpers advertise simple bolt-on installation using factory bolt holes, the reality is more complex for full-featured systems. Expect to remove the factory bumper, trailer hitch (if equipped), and sometimes modify the exhaust. Most installations require at least 4-6 hours, with swing-out systems taking longer.
Essential tools include a comprehensive socket set, trim removal tools, and often a cutting tool for exhaust modification. Having an extra set of hands is crucial when positioning heavier bumpers during installation. Some also require drilling new mounting holes or other modifications that might exceed your comfort level without proper tools.
With that said, it's recommended to leave the installation to the pros unless you have a ton of friends to help out (or two jacks or cranes). These bumpers can easily get up to 200 pounds, and you never want to even imagine what that feels like on any part of your body.
We all have different goals and use cases, so here's some of the usual builds and their matching bumpers.
For occasional off-roading, a standard high-clearance bumper without swing-outs offers improved protection and departure angle without excessive weight or complexity. The likes of CBI’s Classic Series are the way to go here. These bumpers are available in a couple of configurations, providing customization options.
Full-featured systems with dual swing-outs provide the gear-carrying capacity and access needed for extended trips. Expedition One and BAM offer the most complete solutions for dedicated overlanding builds. Potential customers can confidently buy these full-featured systems to enhance both performance and aesthetics for their overlanding adventures.
Prioritize strength, integrated recovery points, and maximum clearance. One thing to keep in mind is that these features are crucial for ensuring your trail rig can handle tough terrains and recoveries. C4 Fabrication and Dissent Off-Road excel for technical trail builds where every degree of departure angle matters.
Look for lighter-weight options that maintain a relatively stock appearance while improving protection. CBI offers lower-profile designs that don’t compromise daily usability. Their products are superior in the off-roading market for daily drivers.
Most premium bumpers include mounting points for recovery equipment. I recommend allocating a budget for proper shackles, recovery straps, and potentially a receiver hitch-compatible recovery point.
If your trail regularly damage tires, upgrading to a full-size spare carrier is essential. Ensure your carrier can handle larger than stock tires if future upgrades are planned. Some rear bumper already include this as an option.
Swing-out systems often accommodate RotopaX or similar modular containers. Having an additional 2-3 gallons of water and fuel can extend your adventure range significantly. Certain swing-out features can double as steps, providing additional functionality for fuel and water storage.
The expanded mounting options on aftermarket bumpers make adding auxiliary lighting straightforward. High-output reverse lights have proven invaluable during night trail repairs. Additionally, the importance of light fitment for auxiliary lighting cannot be overstated, as it significantly enhances visibility during these repairs.
I’ve found that investing in a quality rear bumper pays dividends in both protection and capability. For most 5th-gen 4Runner owners who regularly venture off-road, I recommend starting with a high-clearance base bumper and adding swing-outs if your adventure style demands additional carrying capacity.
Remember that a rear bumper is part of an integrated protection system, consider how it works with your sliders, skid plates, and front bumper to provide comprehensive protection for your valuable 4Runner. The right bumper not only protects your investment but also expands where you can confidently explore.
Only for components directly affected by the modification. Toyota cannot void your entire warranty for installing a rear bumper, though damage caused by the modification wouldn’t be covered.
About 60% of premium bumpers require some exhaust modification, typically cutting and relocating the tailpipe. Some manufacturers offer optional exhaust cutouts to avoid this. Additionally, for certain rear bumpers, you may need to cut or modify the exhaust to ensure proper installation and fit.
With basic mechanical skills and proper tools, yes. However, these systems are heavy (often 150+ pounds), so having assistance is essential for safe installation. It is also crucial to follow the installation guides and instructions to ensure a successful self-installation.
Typically 8-12 degrees improvement with high-clearance designs, which makes a substantial difference on technical trails. Additionally, maintaining adequate space is crucial for functionality, such as fitting factory spare tires and ensuring compatibility with various accessories.
Comments will be approved before showing up.


